

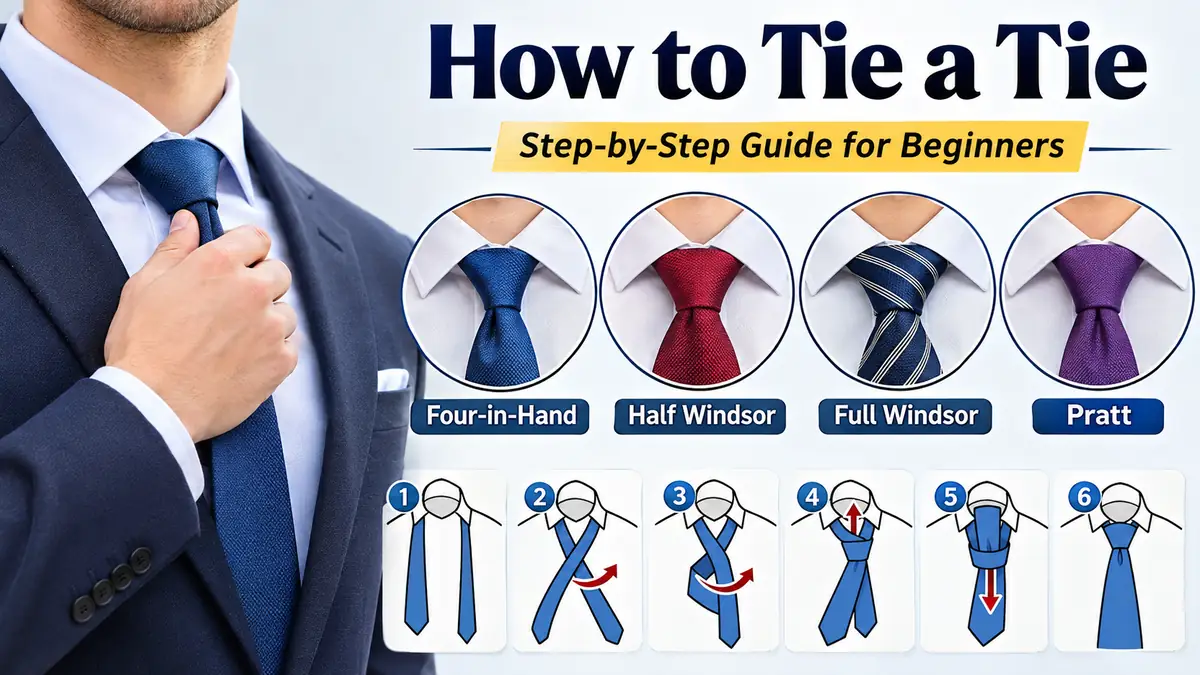
Tying a necktie can feel surprisingly difficult when you’re getting ready for a job interview, wedding, business meeting, or formal event. One wrong fold can leave the knot crooked, too loose, or awkwardly positioned.
Fortunately, learning how to tie a tie is easier than it looks. Once you understand how the wide and narrow ends move around each other, you can create a neat, professional knot in less than a minute with practice.
To tie a tie, place it around your neck with the wide end longer than the narrow end. Cross the wide end over, wrap it around according to your chosen knot, and pull it through the front loop. Tighten gently, center the knot, and adjust the length.
This guide explains four popular tie knots, how to choose the right one, and how to avoid common mistakes.
How to Tie a Tie Using the Four-in-Hand Knot
The Four-in-Hand knot is one of the easiest and most practical necktie knots. Its narrow, slightly asymmetrical shape works well with most standard shirt collars.
It’s particularly useful for beginners because it requires relatively few movements and uses less tie length than larger knots.
Step-by-Step Four-in-Hand Knot Instructions
1. Position the tie. Place the necktie around your neck with the seam facing inward. Let the wide end hang approximately 12 inches (30 cm) lower than the narrow end. Adjust this starting position according to your height and tie length.
2. Cross the wide end over. Bring the wide end across the front of the narrow end, creating an X just below your collar.
3. Wrap underneath. Move the wide end behind the narrow end, from one side to the other.
4. Bring it across the front. Pass the wide end horizontally over the front of the narrow end again. Keep a finger beneath this front band to preserve an opening.
5. Pull through the neck loop. Bring the wide end upward from underneath through the loop around your neck.
6. Pass through the front opening. Guide the wide end downward through the horizontal band you created in Step 4.
7. Tighten and adjust. Hold the narrow end while gently sliding the knot upward. Center it beneath your collar and smooth the fabric.
The finished knot should look compact, slightly tapered, and naturally asymmetrical.
When Should You Use a Four-in-Hand Knot?
The Four-in-Hand works especially well with:
- Point collars and button-down collars
- Narrow or standard-width neckties
- Casual business outfits
- Everyday office clothing
- Slimmer or lightweight tie fabrics
It is also an excellent choice for a first attempt at tying a necktie.
One useful detail: the knot does not need to be perfectly symmetrical. Its slightly uneven appearance is part of its traditional character.
How to Tie a Tie With a Half Windsor Knot
The Half Windsor creates a more balanced, triangular knot than the Four-in-Hand. Despite its name, it is not simply half the steps of a Full Windsor.
It offers a useful middle ground between a compact everyday knot and a larger formal knot.
Step-by-Step Half Windsor Instructions
- Drape the tie around your neck, with the wide end hanging roughly 12–14 inches below the narrow end.
- Cross the wide end over the narrow end.
- Bring the wide end behind the narrow end.
- Lift the wide end toward the neck opening, pass it down through the neck loop, and bring it out on the same side.
- Move the wide end horizontally across the front of the knot.
- Bring the wide end upward through the neck loop from underneath.
- Pull it downward through the front band.
- Tighten carefully and slide the knot toward your collar.
The result is a medium-sized triangular knot with a relatively symmetrical appearance.
Why Choose the Half Windsor?
The Half Windsor is suitable for professional environments where a polished appearance matters without requiring an oversized knot.
It pairs particularly well with medium-spread collars and standard silk ties.
For many people, it is a versatile option for interviews, office presentations, weddings, and formal dinners.
How to Tie a Tie With a Full Windsor Knot
The Full Windsor, often called the Windsor knot, produces a broad, symmetrical triangular shape.
It is commonly associated with formal business attire and dress shirts featuring spread or cutaway collars.
Because the knot requires more fabric, it works best with a tie that has sufficient length.
Step-by-Step Full Windsor Instructions
- Place the tie around your neck with the wide end substantially longer than the narrow end.
- Cross the wide end over the narrow end.
- Bring the wide end upward through the neck loop from underneath and let it fall down on the opposite side.
- Pass the wide end behind the narrow end to the other side.
- Bring the wide end over the top of the neck loop and down through it, forming the second side of the knot.
- Move the wide end horizontally across the front.
- Bring the wide end upward through the neck loop from underneath.
- Pass it downward through the front band.
- Tighten the knot evenly, shape the triangle, and center it beneath your collar.
You may need to adjust the starting position several times before achieving the correct finished length.
When Is a Full Windsor Appropriate?
The Full Windsor is especially suited to occasions requiring a structured, formal appearance.
Examples include business ceremonies, formal presentations, weddings, and occasions where a wide-spread collar is worn.
However, the knot may appear bulky when made with a thick wool tie or worn with a narrow collar.
The Full Windsor is often associated with the Duke of Windsor, although the Duke himself was better known for wearing thick ties that created the appearance of a substantial knot rather than necessarily using the modern Full Windsor technique.
How to Tie a Tie Using the Pratt Knot
The Pratt knot, also known as the Shelby knot, offers a neat, medium-sized shape and an alternative to the more familiar Windsor family.
Unlike most conventional tie knots, it begins with the tie inside out.
Step-by-Step Pratt Knot Instructions
- Place the tie around your neck with its seam facing outward and the wide end longer than the narrow end.
- Cross the wide end underneath the narrow end.
- Bring the wide end upward and over the neck loop, then down through the loop to the same side.
- Pull gently to form the knot’s foundation.
- Move the wide end horizontally across the front of the knot.
- Bring the wide end upward through the neck loop from underneath.
- Pass it downward through the front horizontal band.
- Tighten, straighten, and adjust the knot until it sits comfortably against your collar.
The Pratt knot generally produces a tidy triangular shape without the bulk of a Full Windsor.
It works with many conventional dress shirts and is useful when you want a balanced knot without using excessive tie length.
Comparing the Four Most Popular Tie Knots
Different necktie knots produce different shapes, sizes, and levels of formality. The best choice depends on your collar, tie material, and personal preference.
| Tie knot | Difficulty | Knot size | Best suited for |
|---|---|---|---|
| Four-in-Hand | Easy | Small | Everyday wear, point collars |
| Half Windsor | Moderate | Medium | Business wear, medium-spread collars |
| Full Windsor | Moderate | Large | Formal outfits, spread collars |
| Pratt | Moderate | Medium | Business attire, versatile styling |
For beginners, the Four-in-Hand is usually the easiest knot to learn. Once you can tie it consistently, the Half Windsor is a natural next step.
There is no universally correct knot for every occasion. A well-proportioned, neatly tied simple knot often looks better than a complicated knot that does not suit the shirt.
How Long Should a Tie Be?
A properly tied necktie should generally end around the top or middle of your belt buckle.
The exact position can vary slightly with body proportions, clothing style, and the shape of the tie’s tip.
Finding the Correct Tie Length
After tightening the knot, check three things:
- The wide end should reach approximately your belt buckle.
- The narrow end should ideally remain hidden behind the wide end.
- The knot should sit close to the collar without pulling uncomfortably against your neck.
If the wide end finishes too high, untie the knot and begin with more length on the wide side.
If it hangs too low, start with the wide end slightly shorter.
Remember that larger knots consume more fabric. A Full Windsor generally requires more tie length than a Four-in-Hand.
What If You’re Tall or Short?
Taller people sometimes find standard-length ties too short, particularly when using fabric-intensive knots.
An extra-long necktie may provide better proportions.
Shorter people may prefer a compact knot or adjust the starting position so more fabric is used in the narrow end.
The goal is a balanced appearance rather than following one fixed starting measurement.
How to Make a Perfect Tie Knot
Knowing the wrapping sequence is only part of tying a necktie properly. Small finishing details can make a noticeable difference.
Create a Dimple Beneath the Knot
A tie dimple is the small vertical indentation that appears directly beneath the knot.
It gives the fabric dimension and creates a more refined appearance.
To create one:
- Leave the knot slightly loose before the final tightening.
- Place your index finger against the center of the wide end immediately below the knot.
- Pinch the fabric gently on either side of your finger.
- Pull the wide end downward while maintaining the fold.
- Remove your finger and adjust the crease.
Silk ties often form dimples relatively easily, while very stiff fabrics may require additional shaping.
A dimple is a styling preference rather than a requirement.
Center the Knot Properly
The knot should sit directly beneath the center of your shirt collar.
If it leans noticeably to one side, loosen it slightly and adjust the fabric before tightening again.
Avoid twisting the narrow end while pulling the knot upward.
A Four-in-Hand knot naturally has some asymmetry, so its shape should not be forced into a perfectly even triangle.
Adjust the Tightness
A properly tightened tie should remain in place without feeling restrictive.
You should be able to move your head comfortably and breathe normally.
If the collar feels excessively tight, check your shirt’s neck size rather than simply forcing the tie knot higher.
Use the Keeper Loop
Most conventional neckties have a small fabric loop sewn onto the back of the wide end.
This is called the keeper loop.
After tying the knot, pass the narrow end through this loop to keep it hidden and prevent the two ends from separating during movement.
Some ties also include a label or an additional fabric loop that helps secure the narrow end.
Common Tie-Tying Mistakes and How to Fix Them
Even after learning the basic movements, small errors can affect the finished knot.
| Common problem | Likely cause | How to fix it |
|---|---|---|
| Tie hangs too short | Too little starting length on the wide end | Begin with the wide end lower |
| Tie hangs too long | Too much starting length on the wide end | Start with the wide end higher |
| Knot looks crooked | Uneven fabric tension | Loosen and reshape before tightening |
| Knot looks bulky | Thick fabric or large knot style | Try a Four-in-Hand |
| Knot keeps loosening | Insufficient tightening or slippery material | Tighten gently and check the front loop |
| Narrow end is visible | Incorrect starting lengths | Adjust the initial position |
| Tie becomes wrinkled | Excessive pulling or tight storage | Untie carefully and hang or roll loosely |
Why Does My Tie Knot Look Too Big?
A large knot may result from thick material, excessive wrapping, or a knot that is unsuitable for the collar.
For example, combining a thick wool necktie with a Full Windsor can create unnecessary bulk.
Try a Four-in-Hand or Half Windsor instead.
Why Does My Tie Keep Coming Loose?
A loose tie knot often results from insufficient tension during the final tightening.
Hold the narrow end steady while moving the knot toward your collar.
Then adjust the front band so it lies smoothly against the underlying fabric.
Avoid pulling too aggressively, particularly with delicate silk.
Why Is the Narrow End Longer Than the Wide End?
This usually means the starting lengths were incorrect.
Untie the necktie and begin with the wide end hanging farther down.
Remember that the amount of fabric consumed depends on the knot style, tie thickness, and your body proportions.
Choosing the Right Knot for Your Shirt and Occasion
A necktie knot should complement your shirt collar rather than compete with it.
Point Collar Shirts
Point collars have relatively narrow spacing between the collar tips.
A Four-in-Hand knot usually fits comfortably between them without appearing oversized.
A compact Pratt knot can also work.
Spread Collar Shirts
Spread collars provide more space around the neck opening.
They generally accommodate medium and large knots, including the Half Windsor and Full Windsor.
The wider collar opening helps balance a broader triangular knot.
Button-Down Collars
Button-down collars are commonly associated with more relaxed or business-casual styling.
A Four-in-Hand knot is often a natural match because of its compact shape.
Weddings and Formal Events
For weddings, the appropriate knot depends on the dress code, shirt collar, and overall outfit.
A Half Windsor offers a balanced appearance for many formal occasions, while a Full Windsor can complement a wider collar.
For traditional black-tie attire, a bow tie is generally worn instead of a conventional necktie.
Job Interviews and Business Meetings
A simple, well-tied knot is usually preferable to an elaborate design.
Both the Four-in-Hand and Half Windsor are dependable choices for professional settings.
The most noticeable details are usually correct length, clean fabric, and a knot that sits neatly against the collar.
How Tie Material and Width Affect the Knot
The material of a necktie influences how easily it can be tied, how large the knot appears, and how well it holds its shape.
Silk ties are popular for formal and business clothing because they drape smoothly and often produce attractive dimples.
Polyester ties vary in thickness and flexibility. Some hold a neat knot easily, while stiffer examples can be more difficult to shape.
Wool ties are frequently thicker and may create bulky knots. A Four-in-Hand often works well with them.
Knitted ties have a textured appearance and usually pair well with compact knots. They may not produce a conventional dimple.
Tie width matters too. A skinny tie often looks balanced with a smaller knot, while a traditional-width tie can accommodate a broader knot depending on the fabric.
The width of your shirt collar and the thickness of the material are generally more useful guides than the occasion alone.
How to Practice Tying a Tie Faster
Learning to tie a necktie becomes easier when you repeat the same movements consistently.
Start with the Four-in-Hand knot rather than attempting several styles simultaneously.
Practice in front of a mirror, using the same starting position each time.
Pay attention to the direction of each movement:
- Across the front
- Behind the narrow end
- Across the front again
- Up through the neck loop
- Down through the front band
Once these movements feel familiar, concentrate on adjusting the finished length and shaping the knot.
A useful practice method is to tie the knot slowly three or four times, fully undoing it between attempts.
Avoid simply loosening the same knot and tightening it repeatedly. Starting again helps you remember the entire sequence.
Can You Tie a Tie Without a Mirror?
Yes. Once you’ve learned the movements, you can tie a necktie by touch.
Your fingers can identify the front band, neck loop, and wide end without needing to see them.
However, a mirror remains helpful for checking the final length, alignment, and collar position.
Can You Tie a Tie With One Hand?
Some people can tie a necktie using one hand with practice or adapted techniques, but conventional knot instructions generally assume both hands are available.
A pre-tied or specially adapted necktie may be more practical for someone with limited hand mobility.
How to Untie and Store a Necktie Properly
Removing a tie correctly helps preserve its shape and reduce unnecessary creasing.
Instead of pulling the narrow end forcefully through a tightened knot, reverse the tying process.
Loosen the knot gently, pull the wide end back through the front opening, and unwind the remaining wraps.
Once removed, hang the tie on a suitable rack or roll it loosely for storage.
Avoid leaving a necktie permanently knotted, especially if it is made from delicate silk.
Repeated pressure in the same area can create stubborn wrinkles and affect the fabric’s shape.
If a tie develops creases, allow it to rest before attempting treatment. Follow the manufacturer’s care instructions, since heat and moisture can damage some materials.
Final Thoughts on How to Tie a Tie
Learning how to tie a tie is a practical skill that becomes much easier with repetition.
The Four-in-Hand is an excellent starting point because it is simple, compact, and suitable for everyday wear. The Half Windsor provides a more balanced shape, while the Full Windsor creates a broader formal knot. The Pratt offers another versatile alternative.
Whichever style you choose, focus on three finishing details: a comfortable knot, a centered position beneath the collar, and a wide end that reaches approximately your belt buckle.
Practice the Four-in-Hand a few times until the movements feel natural. Once you’ve mastered it, experimenting with other knots becomes considerably easier.
